Looking for a way to add a personal touch to your gift-giving? Look no further than these DIY gift bag ideas! Whether you’re on a budget or just looking for a fun project, these tutorials offer creative and unique alternatives to store-bought gift bags. With 25 different designs and themes to choose from, you’re sure to find the perfect idea for any occasion.
From personalized bags made by the kids to embellished creations using common household items, these tutorials are easy to follow and require minimal materials and tools. So why not try your hand at crafting up some awesome DIY gift bags today?
DIY Fast Gift Bag

If you’re in a rush or can’t find the perfect gift bag to match your gift, consider making your own. With just a few easy steps, you can cut and glue a gift bag in no time. The process is simple, especially if you have wrapping paper, ribbon, and a cardboard box. Here’s how you can do it:
- Cut the wrapping paper according to the size of your gift.
- Fold the wrapping paper accordingly to create the shape of a gift bag.
- Secure the edges with a glue runner.
- Add a ribbon as your gift bag’s handle.
Once you get the hang of it, making your own gift bag can be a fun and easy way to add a personal touch to your gift. Plus, there are endless designs you can create that will make your gift stand out from the rest. Give it a try and see how simple and satisfying it can be!
DIY Paper Gift Bag
With an A4 sheet of beautiful and flowered paper, you can create your own gift bag in just a few simple steps. First, determine the size of the gift bag based on the size of the paper and your desired loudness. Next, apply glue to the edges of the paper and fold the paper in half. Then, fold the sides of the paper inward to create a triangular shape and secure with more glue. Finally, fold the bottom of the paper upward and secure with glue to create the bottom of the gift bag. Add a ribbon to finish off the bag and make it look even more adorable.
How To Make Paper Bag At Home
Making a paper bag at home is an easy and fun activity that anyone can do. You only need a few materials to get started. Here are the steps to follow:
- Gather your supplies: colored paper, glue stick, scissors, and decorative tape or markers (optional).
- Cut the paper to the desired size for your bag.
- Fold the paper in half vertically and crease it well.
- Open the paper and fold the two sides towards the center crease.
- Fold the bottom of the paper up about an inch or two and crease it well.
- Flip the paper over and fold the bottom up again, this time folding it to the top of the previous fold.
- Fold the top of the paper down about an inch or two and crease it well.
- Open the top fold and fold the sides towards the center crease.
- Apply glue to the inside of the folds and press them together to create the bottom of the bag.
- Fold the top of the bag down and punch two holes on each side of the bag.
- Thread a ribbon or string through the holes to create handles for the bag.
- Embellish the bag with decorative tape or markers (optional).
With these easy steps, you can create your own custom paper bag at home. Have fun with it and get creative!
How to Make a Gift Bag Out of Wrapping Paper

Gift bags made out of wrapping paper are a great way to add a personal touch to your presents. They are also quick and easy to make, reducing your stress during the busy holiday season. Here’s how to make your own gift bag:
- Cut a piece of wrapping paper to the desired size. A good rule of thumb is to make it twice as wide as the item you are wrapping and about three times as tall.
- Fold the paper in half lengthwise, with the patterned side facing inward.
- Use double-sided tape or glue to seal the sides of the bag, leaving the top open.
- Fold down about an inch of the top of the bag to create a neat edge.
- Punch two holes in the top of the bag, about an inch apart.
- Thread a ribbon or cord through the holes and tie a bow to close the bag.
With these simple steps, you can create a unique and stylish gift bag that will impress your friends and family. Plus, you’ll save money and reduce waste by reusing wrapping paper instead of buying new bags.
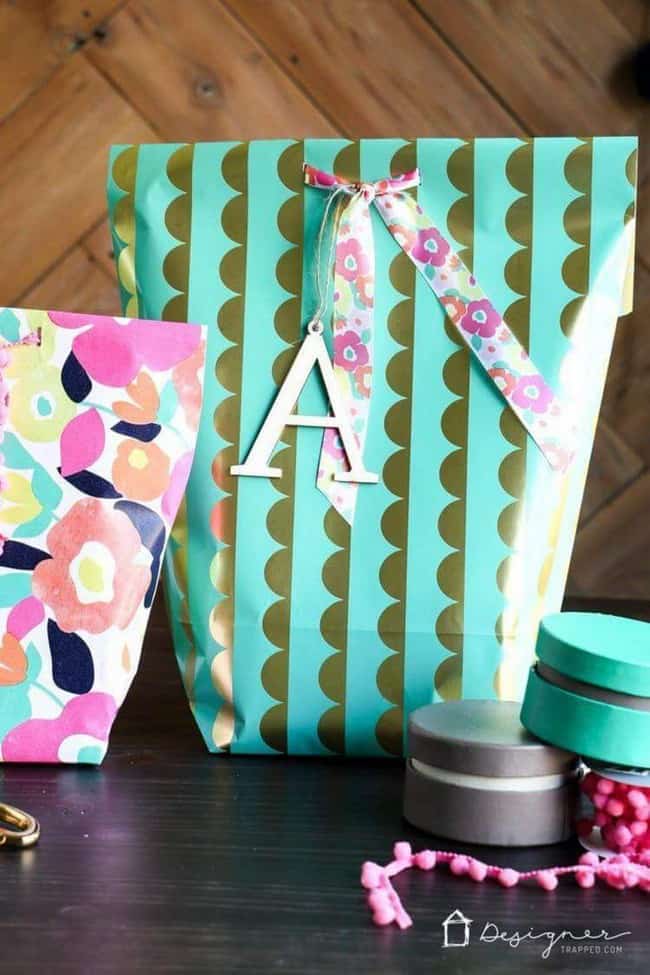
DIY Gift Box
Looking for a creative way to give a special present? Why not try making a DIY Gift Box? It’s an adorable and really cute way to make beautiful handmade gift bags. All you need is a colored sheet, a printed sheet, a piece of ribbon, glue, and some scissors. With your own hands, you can create a special gift for someone’s birthday or any occasion. This gift bag is made from only the best materials, so it will last in time and can be used over and over again. Plus, it’s an eco-friendly alternative to traditional gift wrapping. Follow the simple steps below to make your own DIY Gift Box:
Materials:
- Colored sheet
- Printed sheet
- Piece of ribbon
- Glue
- Scissors
Instructions:
- Cut the colored sheet to the desired size of your gift box.
- Cut the printed sheet slightly smaller than the colored sheet and glue it on top of the colored sheet.
- Cut four strips of the colored sheet and fold them in half to create the sides of the gift box.
- Glue the sides of the gift box to the bottom of the colored sheet.
- Cut a piece of ribbon and tie it around the gift box to secure it.
Now you have a beautiful DIY Gift Box that you can use to give a special present to your loved ones.
DIY Gift Bag From Wrapping Paper
Create a personalized gift bag from any piece of wrapping paper by following these simple steps:
- Cut the wrapping paper to the desired size. A good rule of thumb is to make the width twice the height of the bag you want to create.
- Fold the wrapping paper in half, with the pattern facing inward.
- Cut two lines from the folded edge towards the center of the paper, leaving about 2-3 inches of uncut paper in the center.
- Unfold the paper and fold the bottom edge up to create the bottom of the bag. Secure with tape.
- Fold the sides of the bag towards the center and secure with tape.
- Punch holes in the top of the bag and attach a gift tag with ribbon or string.
With just a few simple tools and some creativity, you can create a unique and personalized gift bag for any occasion. Impress your friends and family with your DIY skills and give them a gift they’ll never forget.
DIY Paper Gift Bag
If you need a gift bag for small items, making your own paper gift bag is an easy and stylish option. To create a DIY paper gift bag, you will need a sheet of wrapping paper, some glue or tape, scissors, a hole punch, and ribbon.
To begin, determine the size of the gift bag you need. If you want to create a larger bag, use a piece of wrapping paper. For a smaller bag, a regular sheet of copy paper will suffice. Adjust the size of the paper based on the size of the gift item.
Next, measure the height of your gift and double it, adding an inch for overlap. Measure the circumference of the gift and add inches for overlap. Cut the paper to size and fold it in half. Then, fold the sides of the paper inward and secure with glue or tape. Punch holes in the top of the bag and thread ribbon through them to create handles.
With these simple steps, you can create a personalized gift bag for any occasion.
13. DIY Custom Gift Bag With Laser
Make your gift stand out by creating a personalized gift bag with a laser cutter and CorelDraw. This project is perfect for adding your own unique touch to a paper or cloth bag. With our easy-to-follow instructions, you’ll be able to create beautifully decorated bags for all of your friends and family.
To get started, design your custom bag using CorelDraw and get it ready for cutting. Then, use the laser cutter to cut out your design and assemble the bag. With this DIY project, you’ll have a one-of-a-kind gift bag that will impress anyone who receives it.
To learn more about this project and get step-by-step instructions, click the link provided.
How To Make A Gift Bag From Wrapping Paper
Are you tired of spending money on gift bags and want to create your own? With just a few simple steps, you can turn ordinary wrapping paper into a chic and sturdy gift bag that is perfect for any occasion. Follow these steps to create your own gift bag:
- Choose your wrapping paper: Select a piece of wrapping paper that is large enough to fit your gift and sturdy enough to hold its weight. You can use any type of wrapping paper, but thicker paper or cardstock works best.
- Fold the paper: Place the wrapping paper on a flat surface with the patterned side facing down. Fold the paper in half lengthwise, then fold it in half again widthwise. Crease the folds well.
- Cut the paper: Cut along the folded edges on the bottom of the paper, leaving a strip at the top that is about 2 inches wide. This strip will become the bag’s handle.
- Create the sides of the bag: Unfold the paper and fold the sides inwards along the creases you made earlier. Make sure the edges overlap slightly in the middle. Secure the sides with double-sided tape or glue.
- Fold the bottom of the bag: Fold the bottom of the bag up about 2 inches and crease it well. Open the folded section and push the sides inwards to create triangles. Fold the triangles down and secure them with tape or glue.
- Attach the handle: Fold the top strip of paper in half and punch two holes about an inch apart near the top of each side. Thread a ribbon or string through the holes to create a handle.
With these simple steps, you can create your own gift bag from wrapping paper and save money while still presenting your gift in a stylish way.
DIY Cute Paper Gift Bag
Making a DIY cute paper gift bag is a great way to add a personal touch to your gift-giving. With just a few simple steps, you can create a unique and adorable gift bag that is perfect for any occasion.
To start, you will need a 25 by 25cm paper of your choice. You can draw cute characters or designs to personalize your gift bag. Once you have your paper ready, follow these steps:
- Fold the paper in half diagonally to create a triangle.
- Unfold the paper and fold the top and bottom edges towards the center crease.
- Fold the bottom corner up towards the center crease and repeat on the other side.
- Fold the top corner down towards the bottom of the bag.
- Fold the sides of the bag inwards to create a crease.
- Unfold the sides and tuck the bottom flaps into the bag.
- Fold the sides back inwards and crease the sides to create a finished bag.
These DIY gift bags are perfect for any occasion, whether it’s a birthday, special event, or just to keep things tidy. With enough variety, you can ensure that your paper crafting is unique. The lovely art behind this paper has answered the question of whether a bag made of paper will be capable of containing items. So, get creative and start making your own DIY cute paper gift bags today!
How To Craft A DIY Gift Bag

Crafting a DIY gift bag is a great way to add a personal touch to your gift-giving. Follow these simple steps to create your own beautiful and sturdy gift bag.
Materials Needed
Before beginning the crafting process, make sure you have all the necessary materials on hand. You will need a glue stick, cord, a 16 cm x 16 cm (6 ⅓ in x 6 ⅓ in) cardboard, double-sided tape, printable gift bag & gift tag, burgundy tissue paper, pink curling ribbon, crafting scissors, and a hole punch.
Step-by-Step Instructions
- Print your gift bag & gift tag.
- Cut out the pieces and fold flaps.
- Reinforce the bag by adding double-sided tape to the inside of the flaps.
- Assemble the bag by folding the sides and bottom flaps and gluing them together.
- Punch holes in the top of the bag and attach cord for handles.
- Add tissue paper and your gift, and finish with a personal note and curling ribbon.
By following these easy steps, you can create a beautiful and sturdy DIY gift bag that is sure to impress your loved ones.
DIY Paper Gift Bag
Making your own gift bags is a fun and easy way to add a personal touch to any gift. With just a few simple supplies, you can create a unique and sturdy gift bag that is perfect for any occasion. To make your own gift bag, you will need the following supplies:
- A4 size cardstock paper
- Scissors
- Ribbon or string
- Hole puncher
To begin, cut your cardstock paper to the desired size for your gift bag. Then, fold the paper in half lengthwise, and make two cuts along the folded edge, leaving about an inch of space between each cut. Next, fold the paper in the opposite direction and make two more cuts along the folded edge, again leaving about an inch of space between each cut.
Now, fold the paper along the creases to create the sides of the gift bag. Use a hole puncher to create two holes at the top of each side, and thread your ribbon or string through the holes to create handles for your gift bag. Finally, decorate your gift bag with stickers, stamps, or other embellishments to make it truly unique.
In just a few easy steps, you can create a beautiful and eco-friendly gift bag that is sure to impress. So why not give it a try and see what you can create?
17. DIY Gift Bag
If you’re looking for a creative and cost-effective way to wrap your gifts, making your own gift bags at home is a great option. With just a few materials and some creativity, you can create a personalized gift bag that will impress your loved ones.
To make a DIY gift bag, you will need some decorative paper, glue, scissors, and a ribbon or string for the handle. Start by cutting the paper to the desired size and shape, making sure to leave extra space for folding and gluing. Then, fold the paper in half and glue the sides together, leaving the top open for the handle.
To add some extra flair, you can use glitter or other decorations to embellish the bag. You can also experiment with different shapes and sizes to create a variety of gift bags for different occasions.
Not only is making your own gift bag a fun and creative activity, but it also allows you to customize your wrapping to match the recipient’s personality and interests. So, next time you’re wrapping a gift, try making your own DIY gift bag for a unique and thoughtful touch.
How to Make a Paper Gift Bag

Making a paper gift bag is a simple and fun activity that anyone can do. All you need is an A4 sheet of paper, glue, and some creativity. Here’s a step-by-step guide on how to make a paper gift bag:
- Take an A4 sheet of paper and fold one of the sides almost to the end.
- Use glue to close the leftover space at the end.
- Fold the bottom up and crease both sides.
- Open it back up and press all the creases down to make a flat bag.
- Decorate the bag with markers, stickers, or any other decorative material you like.
- Fill the bag with candy, small gifts, or any other surprises you want.
This easy trick works with any paper, so you can use funky wallpaper or gift wrap to make your gift bag unique. With a little bit of practice, you can make a paper gift bag in no time and impress your friends and family with your creativity.
DIY Paper Gift Bag
Looking for an easy and affordable way to make a gift even more special? Consider creating a DIY paper gift bag! With just a few simple materials, including brightly colored paper, glue, and ribbon, you can create a personalized and unique gift bag that your loved ones will adore.
One of the best things about making your own gift bag is that you can adjust the size to fit your specific needs. Whether you’re giving a small token of appreciation or a larger present, you can create a bag that perfectly fits the item inside. Plus, you can get creative with the design by choosing different types of paper or even drawing something on the bag to make it even more special.
Not only are these DIY gift bags adorable and convenient, but they’re also incredibly easy to make. You don’t need a lot of time or resources to create them, making them a great option for last-minute gift-giving. Plus, they’re an eco-friendly alternative to traditional gift wrap, which often ends up in the trash.
To make your own DIY paper gift bag, simply follow these easy steps:
- Choose your paper and cut it to the desired size.
- Fold the paper in half.
- Cut two small slits at the top of the paper, about an inch apart.
- Fold the top of the paper down to create a flap.
- Glue the sides of the paper together to create a pocket.
- Fold the bottom of the paper up to create a base for the bag.
- Add ribbon or other embellishments as desired.
With these simple steps, you can create a beautiful and personalized gift bag that your loved ones will cherish. So why not try making your own DIY paper gift bag today?
Drawstring Fabric Gift Bag
If you’re looking for a unique way to customize your gifts, DIY Drawstring Fabric Gift Bags are a great option. The material offered here is rich in color and measures 14 inches by 11 inches, making it an ideal size for a variety of gifts.
To create your own fabric gift bag, start by turning the material back side facing up and smoothing out any wrinkles. Then, fold the back sides together by folding the material in half and sew where the two ends meet.
Next, turn the bag inside out and press it flat again. Fold the top down ¼ of an inch and sew along both long sides to create a bag-like shape. Hem the bottom ends using a double seam to secure and strengthen the opening.
Finally, make a slit at the center bottom of the bag and put your thread or ribbon through it. After passing the thread or ribbon through the bag opening, pull the ends together to tighten the bag and hold the contents securely inside.
With these easy steps, you can create a customized fabric gift bag that will add a personal touch to any present.
Easy Origami Gift Bag DIY
Creating a beautiful gift bag doesn’t have to be complicated. With just paper, a ribbon, and your hands, you can make a mini gift bag with a big bow at the front using the origami gift bag model. The best part? You don’t need any glue!
To make your own origami gift bag, follow these simple steps:
- Start with a square piece of paper.
- Fold the paper in half diagonally to create a triangle.
- Fold the two corners of the triangle up to the top point.
- Unfold the corners and fold the top point down to the bottom point.
- Fold the two side points in towards the center.
- Fold the top point down to the bottom point again.
- Fold the bottom point up towards the top point.
- Open up the folds on the bottom to create the bag shape.
- Tie a ribbon around the bag to secure it closed and create a bow at the front.
With these simple steps, you can create a beautiful and unique gift bag for any occasion. Give it a try and impress your friends and family with your origami skills!
Funny Gift Bag

If you’re looking for a cute and funny gift bag for a kid’s birthday party or to welcome a newborn baby, this DIY kit is perfect for you. With this kit, you can make your own gift bag using colored paper, a silhouette cloud, and a rainbow that can be easily assembled by hand. The kit includes all the necessary materials, including a printable template that you can use to cut out all the pieces and glue them together to form this adorable gift bag.
The paper clouds come in white, blue, and pink, making them perfect for various occasions, such as weddings, baby showers, and more. To create this gift bag, you’ll need to buy paper, glue, scissors, and a ruler. Once you have all the materials, simply download the template and get ready to create! This DIY kit is a great way to add a personal touch to your gift-giving.
Fabric Gift Bag
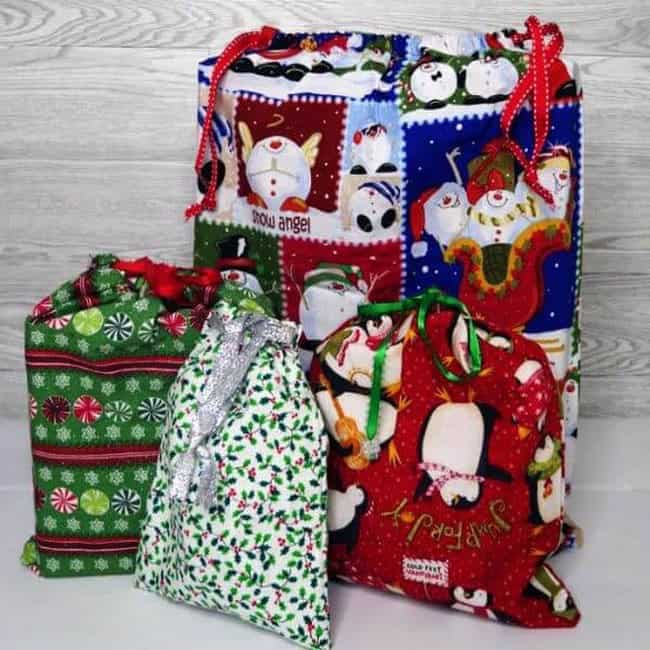
Making your own fabric gift bag is a simple and fun way to add a personal touch to your presents. To get started, you’ll need a piece of fabric, a sewing machine or needle and thread, an iron, and scissors. Cut the fabric to your desired size and fold the sides in, then sew or glue them up. Create a tunnel for your drawstring by folding over the top of the bag and sewing a straight line, leaving a small gap to insert your ribbon. Thread two pieces of ribbon through the tunnel and tie them together with a bow. Your fabric gift bag is now ready to be filled with presents and tied up with a bow!
Easy Christmas DIY Gift Bag

Looking for a quick and easy way to add a personal touch to your Christmas gifts? Why not try making your own gift bags! With just a few simple supplies, you can create unique and festive gift bags in just 5 minutes. Here’s how:
Supplies Needed:
- Plain gift bags (in any size or color)
- Christmas-themed embellishments (such as ornaments, stockings, or snowflakes)
- Ribbon or twine
- Glitter (optional)
- Tissue paper (optional)
Steps:
- Start by choosing your plain gift bag. You can find these at any craft store, or even at some dollar stores.
- Next, choose your Christmas-themed embellishments. You can use anything that fits your theme, such as ornaments, stockings, or snowflakes. These can also be found at craft stores.
- Use hot glue or double-sided tape to attach your embellishments to the gift bag.
- If desired, add some glitter to make your bag extra sparkly.
- Finish off your bag by tying a ribbon or twine around the top.
- For an extra special touch, add some tissue paper to the inside of the bag.
That’s it! With just a few simple steps, you can create unique and personalized gift bags for all your friends and family. Happy crafting!
Summary
Looking for a creative way to make your gift stand out? DIY gift bags are the perfect solution. With just a few supplies and some creativity, you can make a personalized gift bag that will make your recipient feel special. From using recycled materials to adding unique embellishments, the possibilities are endless. Whether you’re looking for a way to save money or just want to add a personal touch to your gift-giving, DIY gift bags are a great option.