Is your draft beer tasting off recently? Is it not foaming as it should? The culprit to these issues could be a dirty or moldy beer line. A dirty draft beer line can affect your brew’s taste and texture. This article teaches how to clean a beer line for smoother bar operations.

Why is Cleaning Beer Lines Important?
Beer leaves behind residues that can alter the taste and quality of the beer. Mineral deposits, molds, protein, and yeast can form in your line system. Poor draft beer line maintenance can lead to calcium oxalate build-up. Also known as beer stones, they grow on lines, fittings, and taps.
Beer stones are a breeding ground for bacteria. They can make your draft system an unsanitary environment for your beer. The presence of microorganisms can also make your beer’s shelf life shorter. Cleaning beer lines regularly can prevent these problems and ensure a safe beverage for you and your guests.
What makes a beer line dirty?
The following are contaminants that can make a beer line dirty. Leaving them unattended can make your beer taste weird or damage your draft system.
- Beerstone: a brownish build-up that looks like limescale.
- Mold: Brown or black contaminant that thrives in damp conditions.
- Yeast: Gray or white fungi you can find outside the beer line.
- Bacteria: microorganisms that can cause an upset stomach.
- Limescale: a white layer that can harden over time
This video reveals what a dirty beer line does to your beer.
How often do you need to clean the beer lines?
Each state has specific guidelines on how often owners must clean their draft beer systems. If you’re a bar owner, the state requires you to follow the cleaning frequency strictly. However, there are general ground rules that you can use to guide you.
Cleaning Checklist
| Every 2 Weeks | ● Disassemble and clean faucets
● Use a detergent cleaner |
| Every 3 months | ● Do an acid cleaning |
| Once a year | ● Replace vinyl jumpers
● Replace vinyl direct draw lines |
| As needed | ● Check, clean, and replace parts |
What’s the Equipment Needed to Clean a Beer Line?

Before cleaning the beer line, you must prepare the required equipment and materials. Some companies offer cleaning kits so you can look for each item quickly.
Cleaning Keg Equipment
Invest in cleaning keg equipment if you own a large bar system. It uses a pressurized cleaning keg powered by carbon dioxide. The following are the tools you’ll need for this method.
- Carbon dioxide tank
- Coupler from the draft system
- Cleaning solution
- Pressurized cleaning keg
- bucket
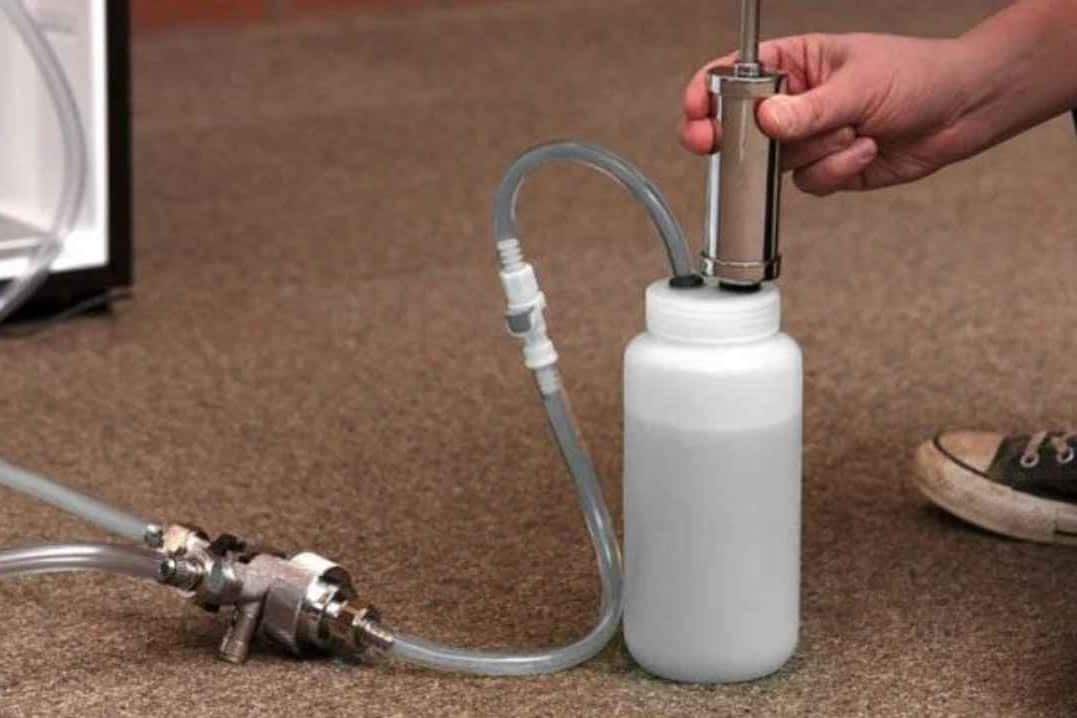
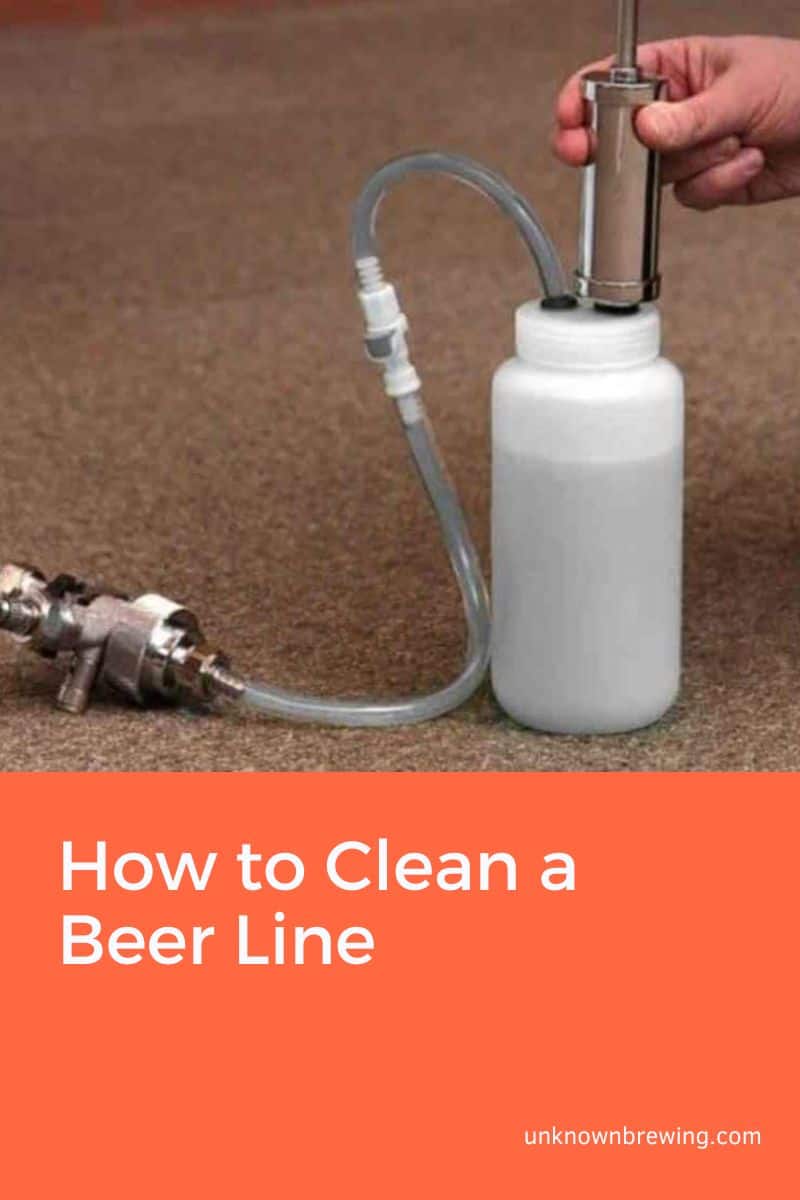
Hand Pump Cleaning Equipment
This set includes a pressurized container or a hand pump and the assembly that goes with them. You also need to prepare a cleaning brush and wrench. Some companies offer a cleaning kit that you can use for bar set-ups, party pumps, and home keg refrigerators.
Here are the things you need to prepare if you’re planning the pressurized method.
- Cleaning jar with pump
- Cleaning solution
- Beer line washers
- Spanner wrench
- Bucket
Safety Equipment
Since you’ll be handling chemicals and metal tools, it’s best to invest in safety equipment. It’s also important to read the hazard information on the cleaning solutions for your safety. Ensure to prepare the following:
- Rubber gloves
- Safety glasses
- Face masks
Cleaning a Beer Line Using A Hand Pump Method

The hand pump method is perfect for home draft beer systems. It utilizes air-pressurized cleaning kits to force the cleaning solution through the tubes. This technique is a quick and simple way to remove harmful gunk from your draft lines. The following are steps for performing the hand pump method.
First Step: Disengage the draft system parts
This stage is an excellent opportunity to clean your draft system’s small parts.
- Turn off the CO2 tank and detach the coupler from the keg.
- Put a check ball lifter in the coupler and allow it to
- Use a spanner wrench to separate the draft faucet.
Second Step: Flush the beer lines
The following are the steps in flushing out and cleaning the beer line.
- Add warm water and cleaning solution to the cleaning jar.
- Connect the kegerator’s faucet shank and the beer line.
- Use a washer between the cleaning jar connector and the faucet shank.
- Pump ½ of the cleaning solution into the lines, then disconnect the coupler.
- Let the solution stay inside the line for about 10 minutes before pumping the other half of the solution.
- Rinse the cleaning jar and fill it with clean water.
- Force the water into the lines to get rid of the cleaning solution in the system.
Third Step: Rejoin the kegerator
It is vital to reconnect all parts correctly to avoid system malfunction.
- Remove the kegerator from the cleaning jar.
- Use a spanner wrench to reattach the faucet.
- Rinse the coupler that’s been soaking in the bucket.
- Disconnect the check ball lifter from the coupler, then reattach it to the beer ker.
- Turn on the CO2 and enjoy fresh beer from your draft system.
Please watch this video for visual instructions on cleaning your beer line.
Cleaning a Beer Line Using a Cleaning Keg
This method is ideal if you want to avoid cleaning the draft beer system by hand. It utilizes a pressurized cleaning keg to flush out the dirt from the lines. The following are the steps to this method.
First Part: Cleaning with the solution
The first part of the process involves flushing the dirt using a premixed solution.
- Set the bucket down below the draft faucet.
- Fill the cleaning keg with a mixture of cleaning solution and warm water.
- Detach the coupler from the beer keg and attach it to the cleaning keg.
- Allow the cleaning solution to flow by opening the faucet.
- Let the solution sit on the lines for around 5 to 10 minutes.
- Open the faucet and flush the system with 2 liters of cleaning solution.
Second Part: Rinsing the beer line
Focusing on this part is crucial to prevent leftover solutions on the beer line.
- Disconnect the coupler from the cleaning keg.
- Relieve pressure by pulling the pressure valve.
- Discard the solution from the cleaning keg and rinse thoroughly.
- Add clean water into the cleaning keg and attach it to the keg coupler.
- Allow 2 liters of fresh water to flow through the lines by opening the faucet.
- Detach the keg coupler from the cleaning jar and attach it to the beer keg.
Here’s a video showing how to clean your beer lines using a cleaning keg.
Conclusion
Keeping your bar equipment clean is one of the keys to having fresh-tasting drinks. Now that you know how to clean a beer line, you can serve delicious beer with excellent foam. The use of cleaning kits can make the job easier for you.

As a homebrewer, Michael would get frustrated about the lack of brewing information on the internet. After hundreds of gallons of spoilt batches, Micheal had enough. And he founded Unknown Brewing as a resource for homebrewers.